
Treating Facial Hyperhidrosis with Iontophoresis
Facial sweating is probably the most distressing area of the body to suffer from Hyperhidrosis. Hidrex machines make it possible to control excessive sweating in this area. Treatment of Facial Hyperhidrosis with Iontophoresis is possible. It’s the most visible area of the body and on show all the time. Quite often a person suffering with facial sweating will find that the trigger can be anxiety or stress as much as it can be from heat. In fact, most patients will report that they feel their facial sweat is always visible. This in turn causes them to sweat more and the issue is made worse.
Results for facial sweating
We need to be honest and clear about this; facial sweating is probably the hardest area of the body to treat. For this reason, facial iontophoresis success rates are among the lowest of all treatment areas. There area few main reasons for this.
- The skin is thinner and therefore prone to discomfort, particularly at high powers but also at moderate strength currents.
- Power levels will be lower, so treatment times can take longer to see results, (but good results are possible).
- Patient apathy. Longer treatment regimes, patients get demotivated and give up*.
About the Hidrex facial mask applicator
The Hidrex facial mask has just been revised. Previously it was a one piece electrode where both electrodes were inserted into the mask on the cheeks. This presented a couple of issues. The issue was that current focused on the cheeks and less so in other areas of the face. As both electrodes were inserted into the mask the circuit would be closed from the outset. This made the mask tricky to manage.
You can view a video from the Embarrassing Bodies series on Channel 4 Television that shows a sufferer of facial Hyperhidrosis using a face mask as part of her treatment regime. Please note, this is showing the old version of the mask.
We considered dropping facial treatment options entirely. However, we felt that as it’s such a distressing area of the body to suffer Hyperhidrosis, we had to continue to offer support for our customers.
Upgraded and re-designed
The new Facial Hyperhidrosis Mask: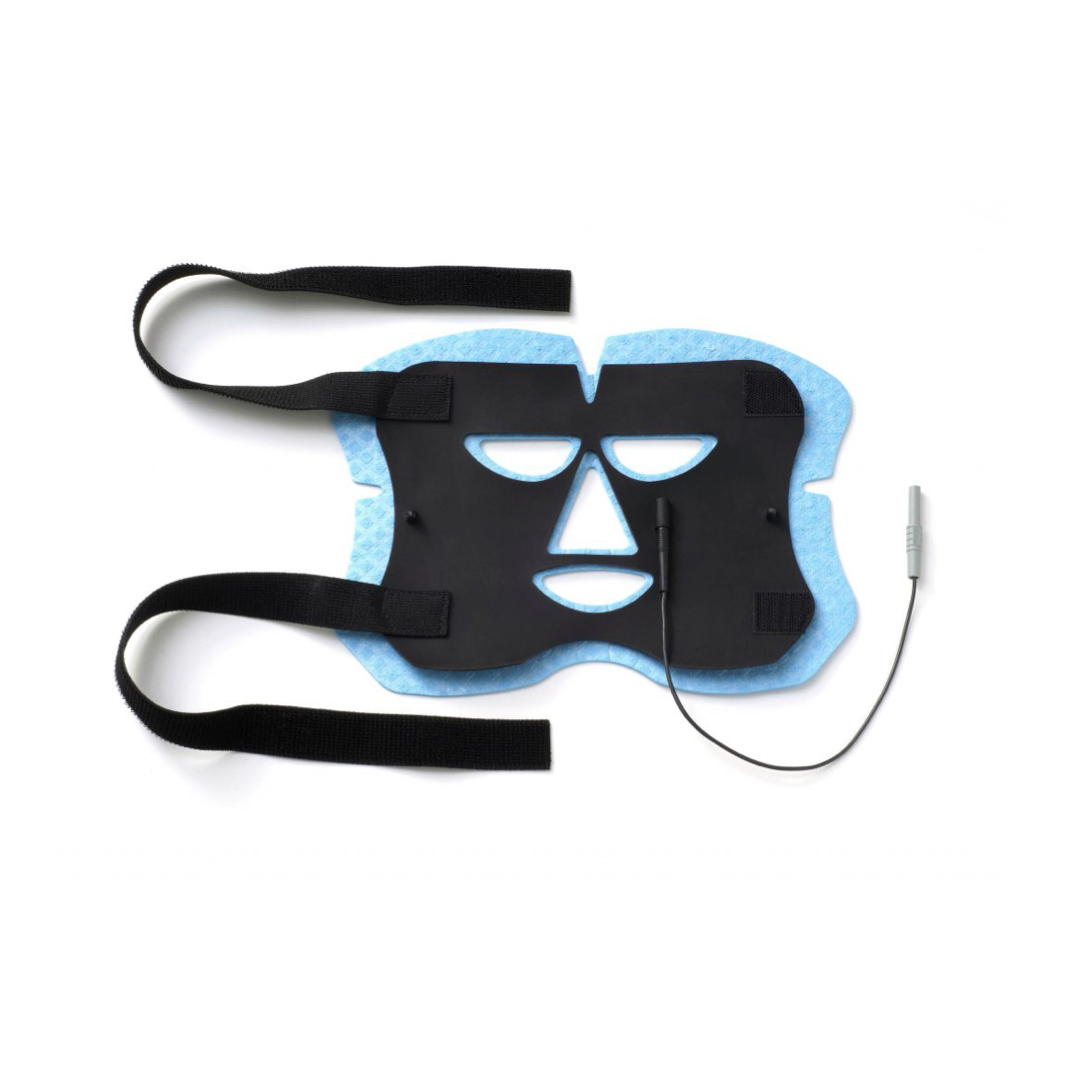
This completely re-designed facial mask now has a pliable silicon based electrode that covers the entire facial area. The electrode will fit and form to the face and offer current directly into the most commonly affected areas of the face.
The new mask is a complete upgrade. It has taken a couple of years to develop and test and it is a vast improvement on previous mask. Initial results at this stage (this edit in June 2019) are encouraging and we have had good results and feedback from our customers.
In addition, it also a one connection electrode. The face mask it attached to existing Hidrex cables and the patient uses their existing hand. foot or underarm electrode to close the circuit. This makes set up a much easier proposition and gives the user time to adjust settings.
Quick Step by Step set up for Hidrex ConnectION with new facial mask applicator.
The Face Mask Applicator has been re-designed to maximise the response to iontophoresis for facial hyperhidrosis. The new mask is now a single electrode piece and so requires a single hand/foot electrode to complete the circuit. The face mask is plugged in to the main electrode cable and the second electrodes cable goes to the hand/foot plate. The hand/foot plate is placed in a treatment tray (or one side of the carry case) which is filled with tap water.
In the initial treatment stage, perform treatments each day for a maximum of 15 minutes. The Hidrex ConnectION is set to 15 minutes by default. The following is a simple quick start guide to help you get going but please do fully read the instructions. This quick start assumes you have trialed tolerance levels on face. and are happy to proceed.
- You need to wet the face mask electrode. Place it in warm tap water.
- Set the machine to a start voltage (8v will be fine for most patients on the initial treatment.
- Screen will show 15:08 in this example. 15 is the time and 08 is the power. It is not 15 minutes and 8 seconds!
- Place the large metal (hand/foot) electrode in a tray or one side of the carry case with 400-500ml of warm tap water.
- Place the plastic distance grid over the metal electrode.
- Fit the wet mask to face and plug grey cable in port at back of machine. (face mask is connected to grey cable and grey cable fitted into port on back of control panel).
- Fit the second grey cable from large electrode plate into the other port on back of the machine.
- When you place your hand or foot in the water filled tray, the circuit will close and treatment will begin automatically.
- You will see the screen semi-colon stop flashing and the power (which is set at 08v) will drop to 0, then slowly power up to 8v
- if at any point during the power up you feel discomfort, press either button and power will be paused.
- If comfortable increase power to the maximum comfortable power level. DO NOT OPERATE AT UNCOMFORTABLE LEVELS
- The machine will automatically count down from 15 minutes.
- If at anytime you wish to pause treatment, simply remove hand/foot from water tray and the circuit will be broken
- If the mask begins to dry out, pause and re-soak. The wetter the mask the better the treatment!
- When treatment is complete, ‘end’ will appear on screen. Remove hand/foot, remove mask. Rinse mask and allow to dry naturally.